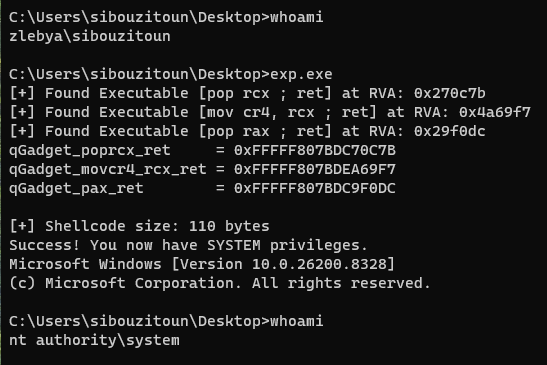
stack-buffer-overflow
When learning Windows kernel exploitation, there is one classic vulnerability that almost everyone encounters first: the Stack Buffer Overflow inside the HackSys Extreme Vulnerable Driver (HEVD).
While modern mitigations make exploiting this vulnerability complex, the core software bug itself is straightforward.
The Vulnerability
In kernel development, developers frequently need to copy data from User-mode to Kernel-mode to process requests. The security of this operation only requires that we never copy more data than the destination buffer can hold.
At the very beginning of the function, the compiler sets aside a fixed amount (2,080 bytes) of memory on the stack to hold the incoming data:
sub rsp, 820hThis is the total local stack space allocated for the function’s variables, including the target buffer.
The vulnerability occurs at the very end of the function setup, right when the driver performs the actual memory copy:
mov     r8, rsi         ; Length (User Provided)
mov     rdx, rdi        ; Source
lea     rcx, [rsp+838h+kernbuff]
call    RtlCopyMemory
Notice the register assignment for the Length parameter (r8). Instead of copying the safe, hardcoded limit of 0x800 bytes (stored in r12d), the driver copies rsi bytes, which contains the size value passed by the user from user-mode.
Because RtlCopyMemory does not perform bounds checking on its own, it will blindly copy exactly as many bytes as you tell it to, even if that number is far larger than 2,048.
[ Lower Memory Addresses ]
       │
       ▼
 ┌───────────┐ <──  kernbuff
 │ 2048 B    │
 ├───────────┤ <──  Saved Registers
 │  24 B     │
 ├───────────┤ <──  Return Address
 │   8 B     │
 └───────────┘
       │
       ▼
[ Higher Memory Addresses ]
If an application sends a buffer larger than 2,072 bytes, the first 2,048 bytes fill up kernbuff. The next 24 bytes overwrite the saved CPU registers (R15, R14, R12). The last 8 bytes overwrite the Return Address with user data.
The “Obvious” Approach
If you are coming to kernel exploitation from a background in user-mode binary exploitation, the first instinct on how to weaponize this is probably the classic “ret2shellcode” method.
- Allocate a chunk of memory in the process and mark it as Read/Write/Execute (RWX).
- Write the shellcode into that buffer.
- Overflow the stack, overwriting the Return Address with a pointer to the RWX buffer.
Historically, this worked flawlessly in ring 0 too. But in modern operating systems, it hits two walls.
SMEP
SMEP (Supervisor Mode Execution Prevention) is a hardware-level protection controlled by a specific bit inside a CPU control register called CR4.
If you attempt the classic user-mode strategy and point the kernel’s Return Address to the user-mode shellcode, the hardware intervenes and crashes the system (BSOD).
The Hanging IRP
In user-mode exploitation, if the exploit crashes the target program after the shellcode runs, it rarely matters. You already got the reverse shell; who cares if the original process dies?
In kernel exploitation, stealing the instruction pointer has system-wide consequences.
When the user-mode exploit script calls DeviceIoControl to talk to the driver, the Windows I/O Manager creates an IRP (I/O Request Packet). This IRP gets passed to the driver’s dispatch routine, which then routes it to the vulnerable function, TriggerBufferOverflowStack.
By overwriting the Return Address, the buffer successfully hijacked the CPU. But it also prevented the driver from finishing its job.
Under normal circumstances, when TriggerBufferOverflowStack finishes, it returns to the dispatch routine. The dispatch routine then signals the OS that the work order is done by calling IoCompleteRequest.
Trying for example to jump to the usermode code (with a simple swapgs and ret) after the token steal directly would crash. The kernel will see the pending IRP, realize the kernel stack and thread state are completely out of sync and crash the OS.
Bypassing SMEP
To defeat SMEP and safely execute the payload, I had to change how I viewed the stack overwrite.
I can’t simply point the return address at my shellcode. Instead, I need to hijack the execution flow by laying down a sequence of instructions known as a ROP (Return-Oriented Programming) chain.
Because TriggerBufferOverflowStack copies exactly as much data as I specify, I can pack a malicious buffer with a sequence of kernel memory addresses. When the vulnerable function finishes and calls retn it sequentially executes the chain of commands I planted on the stack.
KASLR: To build this ROP chain, I need the exact memory addresses of specific instruction snippets (gadgets) inside the Windows kernel (ntoskrnl.exe). However, modern Windows uses KASLR (Kernel Address Space Layout Randomization), which scrambles the base address of the kernel every time the computer boots.
For this walkthrough, I’m “cheating” by using WinDbg to find the current ntoskrnl base address and calculating the gadget offsets from there. A real attacker here would have to chain this buffer overflow with a second vulnerability, an Information Leak, to leak a kernel pointer back to user-mode, calculate the randomized base address dynamically, and then construct the ROP chain before firing the buffer overflow.
The Malicious Stack Layout
In a 64-bit system, every memory address and register slot on the stack is 8 bytes wide. The target kernbuff is 0x800 (2,048) bytes. Following that are 24 (0x18) bytes of saved registers.
This means the original Return Address sits exactly at offset 0x818, From that point downward, I completely overwrite the stack with my ROP chain:
[ Lower Memory Addresses ]
       │
 ┌─────────────────────────┐  <-- buff + 0x000
 │                         │
 │   "A" x 2048 bytes      │  (Fills kernbuff)
 │                         │
 ├─────────────────────────┤  <-- buff + 0x800
 │   "B" x 24 bytes        │  (saved registers R15, R14, R12)
 ├─────────────────────────┤  <-- buff + 0x818 (Original Return Address)
 │   qGadget_poprcx_ret    │  (Gadget 1: Address of pop rcx; ret)
 ├─────────────────────────┤  <-- buff + 0x820
 │   CR4_smep_smap_off     │  (Data: The new CR4 value to disable SMEP)
 ├─────────────────────────┤  <-- buff + 0x828
 │  qGadget_movcr4_rcx_ret │  (Gadget 2: Address of mov cr4, rcx; ret)
 ├─────────────────────────┤  <-- buff + 0x830
 │   (ULONG_PTR)Payload    │  (Execution: Address of the user-mode shellcode)
 └─────────────────────────┘
       │
[ Higher Memory Addresses ]
Execution Flow
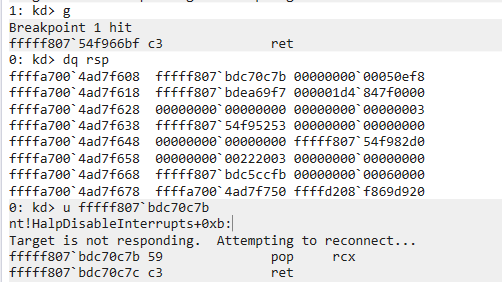
- Pop into Gadget 1: The retn instruction pops the address at 0x818 into the instruction pointer (RIP). The CPU jumps to a tiny snippet of existing kernel code that contains pop rcx; ret.
- Load the New CR4 Value: The pop rcx instruction runs pull the very next item off the stack (buff + 0x820), which is the calculated CR4 value, and loads it directly into the rcx register.
- Pop into Gadget 2: Gadget 1 finishes with a ret. The CPU pulls the next item off the stack (buff + 0x828) and jumps to Gadget 2.
- Disable SMEP: Gadget 2 runs mov cr4, rcx. It takes the value I just loaded into rcx and forces it into the cr4 control register. The hardware protection bit is flipped.
- Jump to Shellcode: Gadget 2 finishes with its own ret. The CPU pulls the next item off the stack (buff + 0x830), which is the address of my user-mode Payload.
Token Steal
With SMEP disabled, the CPU transitions into user-mode memory and begins executing the shellcode.
This payload performs a classic technique known as Direct Kernel Object Manipulation (DKOM). The operating system keeps track of privileges by assigning a “Security Token” to every running process. To become SYSTEM, I need to find the SYSTEM process in memory, copy its token, and overwrite my own token with it.
Exploit (PID 9000)                      Some Random App (PID 854)                 SYSTEM (PID 4)
 ┌─────────────────────────────┐       ┌─────────────────────────────┐       ┌─────────────────────────────┐
 │ EPROCESS Base               │       │ EPROCESS Base               │       │ EPROCESS Base               │
 │                             │       │                             │       │                             │
 │ +0x1D0: PID (9000)          │       │ +0x1D0: PID (854)           │       │ +0x1D0: PID (4)             │
 │                             │       │                             │       │                             │
 │ +0x1D8: ActiveProcessLinks  │ ────> │ +0x1D8: ActiveProcessLinks  │ ────> │ +0x1D8: ActiveProcessLinks  │
 │         (Flink)             │       │         (Flink)             │       │         (Flink)             │
 │                             │       │                             │       │                             │
 │ +0x248: Token (Low Priv)    │       │ +0x248: Token               │       │ +0x248: Token (High Priv)   │
 └─────────────────────────────┘       └─────────────────────────────┘       └─────────────────────────────┘
                                                      ▲                                     ▲
                                                      │                                     │
   1. Read Flink ─────────────────────────────────────┘                                     │
   2. Subtract 0x1D8 to reach Base                                                          │
   3. Check PID at Base+0x1D0 (Is it 4?)                                                    │
   4. If NO, read next Flink ───────────────────────────────────────────────────────────────┘
   5. Subtract 0x1D8 to reach Base
   6. Check PID (It is 4!)
   7. Copy Token at Base+0x248 back to the Exploit
Once that final copy instruction executes, my user-mode application is instantly elevated. Any child process spawned by the application (like a shell) will inherit that SYSTEM token.
The exploit is complete except for one final detail: Cleaning up the stack to save the system from crashing.
The Missing Link
Normally, when TriggerBufferOverflowStack finishes, it returns to a middleman function called BufferOverflowStackIoctlHandler. That middleman then returns to the main driver dispatch routine (IrpDeviceIoCtlHandler).
The problem is that my initial buffer overflow overwrote the return address back to BufferOverflowStackIoctlHandler. That original return address is therefore lost.
However, if we look at the disassembled function, it doesn’t actually do any meaningful work:
call    TriggerBufferOverflowStack
add     rsp, 28h             ; Clean up some stack space
retn                         ; Return to the Dispatcher
I essentially don’t need to return to it at all. I can skip it entirely and jump straight back to the main dispatcher.
NORMAL EXECUTION FLOW
IrpDeviceIoCtlHandler ──> BufferOverflowStackIoctlHandler ──> TriggerBufferOverflowStack
          ▲                              │                                │
          └──────────────────────────────┴────────────────────────────────┘
                                  (Returns step-by-step)

HIJACKED FLOW
IrpDeviceIoCtlHandler ──> BufferOverflowStackIoctlHandler ──> TriggerBufferOverflowStack
          ▲                                                               │
          │                                                               ▼
          │                                                       [ User-Mode Shellcode ]
          │                                                               │
          └───────────────────────────────────────────────────────────────┘
                               (skip the middleman)
I still need the return address for IrpDeviceIoCtlHandler. Fortunately, because the buffer overflow stopped before it reached the higher parts of the stack, that address is still there.
By analyzing the stack frame, I know the dispatcher’s return address is located exactly at rsp + 0x10 at the moment my shellcode starts running. What I’ll display next are the calculation steps to find that offset.
Part 1: Establishing the Baseline (RSP_base)
Let’s define RSP_base as the exact value of the Stack Pointer at the moment the CPU first enters the vulnerable function, TriggerBufferOverflowStack.
At this exact moment:
- The address sitting at RSP_base is the Return Address pointing back to BufferOverflowStackIoctlHandler.
- Any memory address below RSP_base (lower memory) is the local stack frame allocated for the driver’s buffer.
- Any memory address above RSP_base (higher memory) belongs to the calling functions.
Part 2: Tracing the Caller’s Stack Layout
Now let’s look at BufferOverflowStackIoctlHandler:
call    TriggerBufferOverflowStack
add     rsp, 28h
retn
Before it called TriggerBufferOverflowStack, it allocated its own stack frame of 0x28 bytes. Then, it executed the call instruction, which pushed the return address onto the stack (8 bytes), leaving the stack pointer at RSP_base.
I can map this out relative to RSP_base:
- RSP_base + 0x30 (8 bytes): Dispatcher Return Address
- RSP_base + 0x08 to RSP_base + 0x2F (0x28 bytes): BufferOverflowStackIoctlHandler’s Local Stack Frame
- RSP_base (8 bytes): Return Address to BufferOverflowStackIoctlHandler
Part 3: Tracing the Stack Pointer (RSP) Through the First ROP Chain
When the buffer overflow triggers, it overwrites the Return Address at RSP_base and the slots immediately following it.
Step 3a: TriggerBufferOverflowStack returns
The driver finishes and hits its final retn instruction.
- The CPU pops the address at the current RSP (which is RSP_base) into RIP.
- Because of the overflow, this address is now qGadget_poprcx_ret.
- Since a pop/ret instruction shrinks the stack, RSP is incremented by 8. RSP = RSP_base + 0x08
Step 3b: Inside pop rcx; ret
The CPU is now executing my first gadget:
- pop rcx runs. It pops the value sitting at RSP_base + 0x08 (disabled CR4 value) into rcx. RSP increments by 8. RSP = RSP_base + 0x10
- ret runs. It pops the next address sitting at RSP_base + 0x10 (qGadget_movcr4_rcx_ret) into RIP, RSP increments by 8. RSP = RSP_base + 0x18
Step 3c: Inside mov cr4, rcx; ret
The CPU is now executing a second gadget:
- mov cr4, rcx runs (SMEP is now disabled).
- ret runs. It pops the next address sitting at RSP_base + 0x18 (the pointer to my user-mode Payload) into RIP. RSP increments by 8. RSP = RSP_base + 0x20
Part 4: The Payload Math at Entry
The CPU jumps to my user-mode Payload and begins executing its first instruction. At this exact microsecond:
- The current Stack Pointer (RSP) is at RSP_base + 0x20.
- The Dispatcher’s Return Address is sitting untouched at RSP_base + 0x30.
If we calculate the distance between where the Stack Pointer is currently pointing and where the dispatcher’s return address is saved:
(RSP_base + 0x30) - (RSP_base + 0x20) = 0x10 bytes
This is why the shellcode can get the return address with a single instruction:
mov rcx, [rsp + 0x10]Part 5: Reconstructing the Stack for Escape
Once the shellcode saves that address, I need to rebuild the stack for a second ROP chain (re-enabling SMEP and returning).
At Payload Entry:
  RSP = RSP_base + 0x20

Step 1: Save Dispatcher Ret
  rcx = [rsp + 0x10]  (Loads Dispatcher Ret into rcx)

Step 2: Pivot RSP to safety
  add rsp, 0x18       (RSP is now RSP_base + 0x38)

Step 3: Build new ROP chain backwards via PUSH instructions
  push rcx            (Pushes Dispatcher Ret   -> RSP = RSP_base + 0x30)
  push mov_cr4_gadget (Pushes mov cr4; ret     -> RSP = RSP_base + 0x28)
  push cr4_original   (Pushes original CR4     -> RSP = RSP_base + 0x20)
  push pop_rcx_gadget (Pushes pop rcx; ret     -> RSP = RSP_base + 0x18)

Step 4: Execute final return
  ret                 (Jumps to pop_rcx_gadget -> Executes second ROP chain)
By adding 0x18 to RSP before pushing a cleanup ROP chain, I align the final push rcx to write the dispatcher’s return address exactly back to its original slot at RSP_base + 0x30.
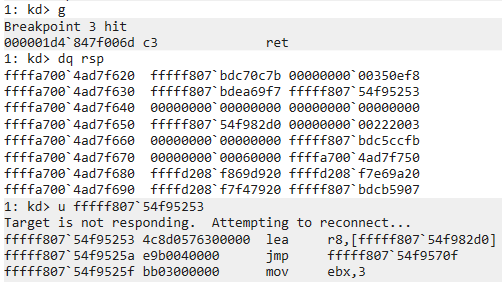
The CPU pops the first gadget off the stack, which loads the original CR4 value into rcx. The next gadget puts that value back into the control register, turning SMEP back on.
The final ret pops the dispatcher address into the instruction pointer. The CPU jumps back into the kernel’s IrpDeviceIoCtlHandler. The dispatcher calls IoCompleteRequest, the IRP is resolved, and the system continues running with perfect stability.