kernel-pool-grooming-defeating-windows-11-lfh
In the previous posts, I relied on control flow hijacking to escalate privileges. However, modern kernel mitigations are making execution hijacking increasingly difficult. To achieve a modern, reliable Local Privilege Escalation (LPE), I’ll need to transition to a Data-Only Attack.
A pure data-only attack requires two primitives: an Arbitrary Read and an Arbitrary Write. While I do already possess an arbitrary write, I’m operating completely blind in kernel space.
In this post, I’ll exploit a Pool-Based Out-of-Bounds Read vulnerability in the driver. I’ll bypass modern Windows 11 Low Fragmentation Heap (LFH) mitigations using Subsegment Saturation and Named Pipes to force deterministic memory layouts and leak critical kernel data structures.
The Historical Shortcut
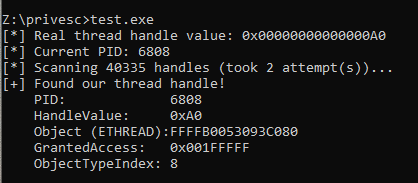
Historically, you didn’t need a complex memory leak vulnerability to solve Problem 2. The cleanest way to find your thread’s _ETHREAD structure in kernel space was directly from user-mode using NtQuerySystemInformation with the SystemHandleInformation class:
if (entry->UniqueProcessId == pid && entry->HandleValue == hRealThread) {
    ethreadAddr = entry->Object; // Leaked kernel address of _ETHREAD
}
The Windows 11 Wall
On modern Windows 11, if you run this handle-leaking routine as a standard, non-privileged user, the API executes successfully, but the Object pointer field returns as NULL.
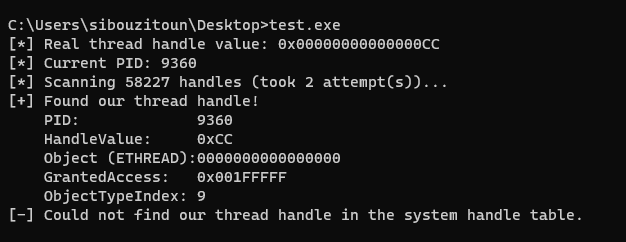
Non-Paged Pool Disclosure Bug
To acquire the kernel pointers necessary to map the target structures, I’ll exploit a dedicated memory disclosure routine exposed by the driver.
TriggerMemoryDisclosureNonPagedPool(PVOID UserBuffer, SIZE_T Size)
{
  PoolWithTag = ExAllocatePoolWithTag(NonPagedPool, 0x1F8u, 0x6B636148u);
  if ( PoolWithTag )
  {
    RtlFillMemory(KernelBuffer, 0x1F8u, 0x41);
    ProbeForWrite(UserBuffer, 0x1F8u, 1u);
    RtlCopyMemory(UserBuffer, PoolWithTag, Size);
    ExFreePoolWithTag(PoolWithTag, 0x6B636148u);
    return 0;
  }
}
Vulnerability Breakdown
The core flaw within this function is a textbook Pool-Based Out-of-Bounds Read.
The function allocates a 504-byte chunk in the NonPagedPool and immediately initializes it using RtlFillMemory(PoolWithTag, 0x1F8u, 0x41). This means I cannot leak stale or uninitialized data from inside the allocated buffer; any data read within the first 504 bytes will simply return a block of 0x41 (‘A’) characters.
The vulnerability lies in the RtlCopyMemory(UserBuffer, PoolWithTag, Size) call. While the application accurately ensures that the destination buffer is a valid user-mode address via ProbeForWrite, it fails to validate the user-supplied Size parameter against the fixed allocation size of the source buffer.
Size is completely user-controlled, I can pass a value significantly larger than 0x1F8. When RtlCopyMemory executes, it will read past the boundary of the allocated buffer and continue copying memory into the user-space buffer.
By over-reading the boundary, the driver hands back the contents of adjacent pool chunks sitting further down in the Non-Paged Pool.
Why a Blind Leak is Useless
Having an out-of-bounds read primitive looks great on paper, but triggering this bug blindly is completely useless.
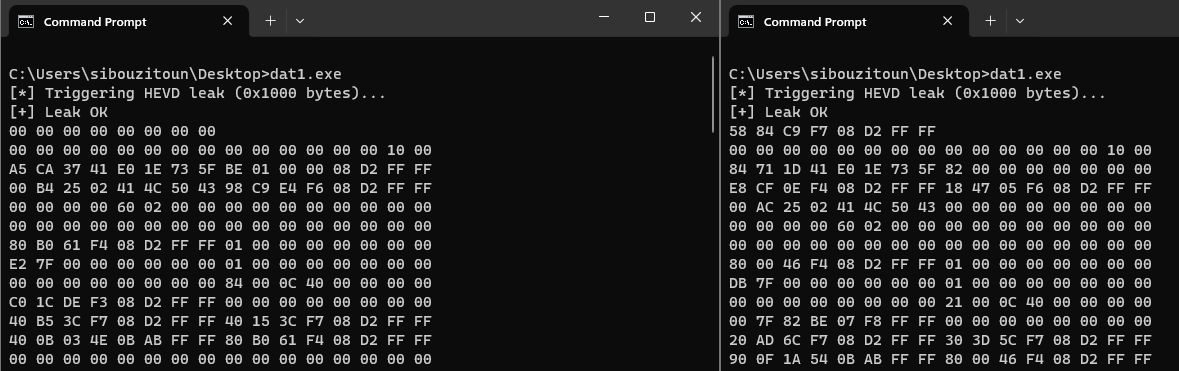
Two successive runs of the leak exploit, nondeterministic results.
The kernel pool is not a static slate. It is a highly dynamic memory region managed by the OS. Every time a process starts, a thread spawns… the kernel allocates and frees chunks of memory. This creates heap fragmentation.
When the driver calls ExAllocatePoolWithTag, the kernel pool manager searches for any available free slot that can accommodate the 504-byte chunk. Without prior preparation, I have absolutely zero control over where the leak chunk lands.
[ Dynamic Kernel Non-Paged Pool (Fragmenteed State) ]
+-------------------+-------------------+-------------------+-------------------+
| Unrelated Object  |    Free Space     | Critical Structure| Unrelated Object  |
|     (PID 1420)    |     (512 bytes)   |    (Secret Data)  |     (Network)     |
+-------------------+-------------------+-------------------+-------------------+
                          │
                          ▼ (vulnerable allocation lands here)
+-------------------+-------------------+-------------------+-------------------+
| Unrelated Object  | Vulnerable Chunk  | Critical Structure| Unrelated Object  |
|     (PID 1420)    |     (0x1F8)       |    (Secret Data)  |     (Network)     |
+-------------------+-------------------+-------------------+-------------------+
                          │
                          ▼ (Next run: different system state)
+-------------------+-------------------+-------------------+-------------------+
| Vulnerable Chunk  | Unused Zeroes     | Page Boundary     | Crash / Bugcheck  |
|     (0x1F8)       | (Useless Leak)    | (Unmapped Memory) |   (Immediate BSOD)|
+-------------------+-------------------+-------------------+-------------------+
Every single execution yields entirely different results depending on the background state of the system:
- Scenario A: land next to an unrelated buffer and leak useless data.
- Scenario B: land next to unallocated space and leak nothing but zeroes.
- Scenario C: land right at the edge of a page boundary. The out-of-bounds read tries to access unmapped memory, triggering a page fault in kernel mode and an immediate Blue Screen of Death (BSOD).
To turn this non-deterministic behavior into a more reliable exploit, I need a way to arrange kernel memory so that I know exactly what object sits directly after the vulnerable buffer. Enter Pool Grooming.
Restoring Order: Pool Grooming (Pool Feng Shui)
To force determinism onto the kernel heap, I’ll use a technique known as Pool Grooming (or Pool Feng Shui). Instead of leaving the allocation to chance, I can manipulate the state of the kernel pool from user-mode before ever touching the vulnerability.
The layout manipulation process works in three distinct phases:
Phase 1: Defragmentation
First, spray a massive number of control objects from user-mode. This exhausts the random, mismatched free holes currently scattered across the kernel pool.
Initial Chaos Layout:
[ Free Slot ] -> [ Random Obj ] -> [ Free Slot ] -> [ Random Obj ]

After Spraying Allocation Block A (Fills all organic holes):
+-----------+-----------+-----------+-----------+-----------+-----------+
| Block A1  | Block A2  | Block A3  | Block A4  | Block A5  | Block A6  |
+-----------+-----------+-----------+-----------+-----------+-----------+
\_______________________________________________________________________/
                          Contiguous Pages
Phase 2: Punching Holes
Once I have a clean sequence of allocations, I selectively free every second or third object in the sprayed chain. This creates perfectly sized, predictable gaps inside the memory layout.
Freeing alternating allocations (e.g., A2, A4, A6):
+-----------+-----------+-----------+-----------+-----------+-----------+
| Block A1  |   HOLE    | Block A3  |   HOLE    | Block A5  |   HOLE    |
| (Target)  | (0x1F8)   | (Target)  | (0x1F8)   | (Target)  | (0x1F8)   |
+-----------+-----------+-----------+-----------+-----------+-----------+
Phase 3: The Leak
Finally, trigger the driver’s vulnerability. Because the pool manager prioritizes recycling recently freed blocks of matching sizes, the vulnerable chunk is slotted directly into one of the controlled gaps just engineered.
Triggering the vulnerable allocation:
+-----------+--------------------+-----------+-----------+-----------+-----------+
| Block A1  |  Vulnerable Chunk  | Block A3  |   HOLE    | Block A5  |   HOLE    |
| (Target)  |     (0x1F8)        | (Target)  | (0x1F8)   | (Target)  | (0x1F8)   |
+-----------+--------------------+-----------+-----------+-----------+-----------+
                                       │
                                       ▼
                         [ Trigger Out-of-Bounds Read ]
                         Reads past Vulnerable Chunk
                         boundary and harvests Block A3.
By over-reading past the buffer size now, I’m no longer guessing. The layout guarantees that the data copied back to user space belongs to the targeted control structure.
The Strict Rules of the Pool Manager
To make pool grooming work, the “filler” object sprayed from user-mode must satisfy two requirements:
- The objects must trigger a kernel allocation that matches the vulnerable chunk’s size (0x1F8 bytes) so that the pool manager considers them interchangeable.
- The objects must reside in the exact same memory pool context.
The kernel allocator separates heap allocations into different bins and pages based on their pool type. If the target object and the vulnerable chunk don’t share the same pool type, they live in isolated areas. An allocation in one will never fill a hole left by the other.
The Executable Bottleneck
The original vulnerable function targets the legacy NonPagedPool (which maps to executable memory space). When I began auditing native Windows structures to find a perfect user-mode controllable filler object for this size, I ran into a problem.
No easily created native Windows object matched both a 0x1F8 size and an executable NonPagedPool allocation.
As part of modern kernel hardening, Microsoft has spent years stripping execution privileges away from standard kernel objects to enforce strict data execution prevention (DEP). Almost every routine object you can spray from user-mode has been migrated to non-executable memory. Finding a native object that still allocates into the legacy executable pool while allowing precise size control is practically impossible on modern Windows 11.
The Pivot: Switching to the NX Counterpart
Faced with this bottleneck, I chose to slightly alter the strategy: I stepped away from the executable pool function and switched my target to its NonPagedPoolNx (Non-Executable) counterpart inside the driver.
This pivot was entirely driven by a desire to use the holy grail of heap grooming objects: Named Pipes.
Why Named Pipes Mandate the NX Shift
Named Pipes are powerful for kernel exploitation because they break the rule of rigid structure sizes. When you write data to a named pipe via standard Win32 APIs, the underlying file system driver creates a data queue entry in the kernel. The size of that kernel allocation is tied to the length of the data buffer you send from user-mode.
This means I can dynamically force the kernel to create allocations of exactly 0x1F8 bytes on demand simply by adjusting the user-mode buffer size.
However, because Named Pipes handle data and headers, Windows strictly allocates them within the NonPagedPoolNx page directory.
If I had kept the driver targeting the old executable NonPagedPool, modern Windows 11 Pool Type Isolation would have completely defeated the exploit. The vulnerable chunk and the named pipes would never cross paths.
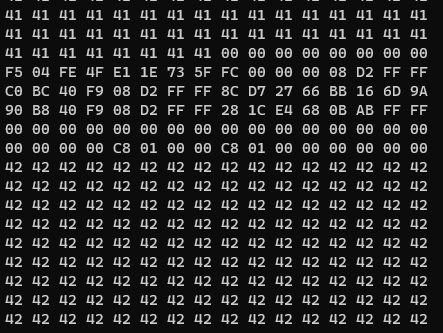
Leak pool (filled with 0x41s) followed by the named pipe object’s pool header, followed by the Data Queue Entry structure (pipeData filled with 0x42s)
The Illusion of Control: Probability vs. Certainty
In older Windows versions, pool allocations were largely deterministic. The pool manager used sequential free-lists, meaning if you freed an object at address X, the very next allocation of the exact same size was guaranteed to claim address X. Sequential pool grooming was clean and reliable.
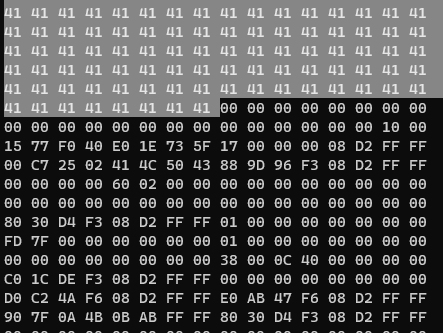
Random Data follows the leak even tho the pool was groomed.
However, because the vulnerable allocation size is 0x1F8 (504 bytes), it falls well below the small-allocation threshold. On modern Windows 11, small pool allocations are managed by the Kernel Pool LFH.
[ Legacy Pool Allocation (Deterministic) ]
Hole Freed at Slot 2 ───> Next Allocation ALWAYS takes Slot 2
+------------+------------+------------+------------+
|   Pipe A   | [  HOLE  ] |   Pipe C   |   Pipe D   |
+------------+------------+------------+------------+
                   ▲
                   └─── Vulnerable Chunk lands cleanly here every time.

[ Modern Kernel LFH (Randomized) ]
Hole Freed at Slot 2 ───> LFH Picks Slot Randomly from Subsegment!
+------------+------------+------------+------------+
|   Pipe A   |   Slot 2   |   Slot 3   |   Slot 4   |  <-- Subsegment Slots
+------------+------------+------------+------------+
                LFH randomly assigns ANY free slot in the subsegment
Why LFH Kills Deterministic Grooming
Microsoft introduced LFH Randomization effectively destroyed sequential “Pool Feng Shui” techniques. When LFH activates for a given bucket size (in this case, the 0x200 byte bucket) it manages memory in blocks called subsegments. Instead of linking free slots sequentially, LFH uses a bitmapped array and randomizes the index of the next slot returned to the caller.
Even if you punch a clean hole right between two of your sprayed Named Pipe objects, LFH will not automatically assign that specific hole to the driver’s vulnerable allocation. It might pick a completely different free slot inside the subsegment or even activate a fresh slot on the outer edge.
Because LFH randomizes slot assignments within the subsegment, you can no longer guarantee that your vulnerable chunk will land directly adjacent to a controlled DATA_QUEUE_ENTRY.
The Subsegment Edge & The Unavoidable BSOD
This LFH behavior is also what directly creates the BSOD risk.
LFH subsegments are page-aligned blocks. If LFH’s randomized slot selector happens to place the vulnerable allocation at the very last slot of an LFH subsegment, the memory page sitting immediately after it might not be allocated or committed yet.
               LFH Subsegment Boundary
                          │
                          ▼
+--------------------+ █ ┌────────────────────┐
|  Vulnerable Chunk  | █ │ Uncommitted Page   |
|   (Slot 0x1F8)     | █ │ (Subsegment End)   |
+--------------------+ █ └────────────────────┘
          │
          └───> [ Out-of-Bounds Read Over-Reads ] ───> PAGE_FAULT_IN_NONPAGED_AREA
                                                      (Instant BSOD)
When the driver triggers RtlCopyMemory with an oversized Size parameter, the read operation crosses the subsegment boundary. If that adjacent page is unmapped, the CPU hardware immediately raises a kernel page fault crashing the system.
Mitigating LFH (Saturated Subsegments)
To fight back against LFH randomization, modern exploit code uses Subsegment Saturation:
Instead of trying to groom individual holes, spray thousands of pipe objects to fill entire LFH subsegments to near-capacity.
[ Saturated LFH Subsegment ]
+-----------+-----------+-----------+------------------+-----------+
| Pipe DQE  | Pipe DQE  | Pipe DQE  | Vulnerable Chunk | Pipe DQE  |
+-----------+-----------+-----------+------------------+-----------+
\___________________________________________________________________/
         Subsegment is 95%+ filled with Pipe Objects!
If a subsegment is 95% populated by Named Pipe objects, LFH has no choice: whichever slot its randomizer selects must sit inside a sea of DATA_QUEUE_ENTRY structures.
This drastically raises the probability that the over-read will hit a valid pipe object, but because LFH randomization can never be turned off from user-mode, the risk of hitting a subsegment edge or a random slot remains probabilistic.
The Wall: A Leak Without a Context
At this point, I have achieved what looks like a massive win: Manipulated the Windows 11 kernel heap, saturated LFH subsegments, and successfully leaked a live DATA_QUEUE_ENTRY (DQE) structure directly into user space.
But when you look closely at what I actually hold, reality sets in:
- The DQE structure contains internal offsets and list pointers, but it does not store its own virtual address in memory.
- Without knowing the exact base address of this DQE, the Write-What-Where primitive is useless; I have nowhere to point it.
I have successfully peeked into kernel memory, but I cannot yet interact with it.
In the next post, I will overcome this limitation by implementing a Double-Pipe Grooming Strategy to mathematically resolve the absolute pool address. I will then turn npfs.sys against itself to construct a fully stable Arbitrary Read primitive and finish with a SYSTEM token swap.